
One way to up your game while speeding up your productivity is learning to take clones. Especially if you’re growing indoors. Starting your next crop from seeds each time can really slow your schedule down. If you’re not making your own stock of seeds, buying them can get very costly.
If you have never taken clones before the mere idea of it can be a little nerve racking. But trust me when I say this. It’s not too difficult, and once you have done it a time or two you’re going to love having the option. There are probably as many opinions as there are methods for taking clones. In this article I will explain a few methods, that I am experienced in.
What is cloning?
Lets start at the basics first. Cloning is a process of taking a clipping from a donor plant and creating a second plant that is an exact genetic copy of it’s donor. Ideally the donor or “Mother†plant is already proven to be female. (See “Sexing Cannabis Plantsâ€) Theoretically all you need to make a clone is a plant or branch that has 3 nodes (areas where leaves are coming out of the stem). I prefer to wait until the lower branches are big enough to produce a few clones as well as being able to take a clipping from the top. If you’re working with sprouts from seeds, expect to wait until the starts are at least 3-4 weeks old.
The first decision you need to make is what type of medium you will be using to “root†the cuttings. There are many options here including rockwool cubes, oasis cubes, rooting plugs, perlite and peat mix, or even aeroponics. They each have their pros and cons, and no one method is that much better than the other that it makes sense for me to recommend just one method.
Rockwool cubes:
 Rockwool or “mineral wool” is molten rock heated to 1600 degrees and a stream of air is blown over it to create a fiber that can be formed. The benefit of rockwool is that it retains a lot of water and it allow for a significant amount of airflow due to it’s porosity. It’s worth mentioning here that rockwool naturally has a high pH level, therefore it needs to be soaked in a rockwool conditioning solution like pH Down that is designed to lower the pH levels before use. Using rockwool with a high pH on your young clones could spell disaster. The plants will have a difficult time rooting and could possibly die. On the upside, due to rockwool’s ability to retain high amounts of water while increasing airflow, roots tend to grow fast in these cubes making them a great option to start your clones in if your willing to lower their natural pH levels.
Another downside to rockwool is the fibers can irritate the skin and eyes when worked with. If you have ever worked with fiberglass insulation, you probably know what I mean. Because rockwool is technically a stone, it does not breakdown in soil or landfills. This might turn some growers off to it’s use. As an aside, many people prefer to put down a layer of perlite so that the roots have a place to go once they have grown out of the cubes.
Oasis cubes:
Oasis cubes are made from an open celled foam. The low density structure allows for lots of water and air to settle into the foam allowing for accelerated root growth. The material is inert, which is to say that it doesn’t raise or lower pH levels. Oasis cubes typically come in sheets that fit directly into nursery trays, and have holes punched in them ready to place your clones stem or seeds. Low density foam is easy to manipulate and punch new holes if the existing holes are not exactly where you want them.
Oasis cubes don’t irritate the skin or eyes like rockwool making it much more friendly to work with, however they do not compost either so environmentally conscious growers may not like this material. Overall, it may take a little longer for plants to root over some other mediums, but are generally easier for many people to get started with.
Rooting plugs:
Rooting plugs such as Rapid Rooters, or Root Riot plus are made from composted tree bark and organic material mixed with a binder. they are designed to hold the perfect amount of moisture and promote root growth. They are very much like a sponge in that they will only hold so much moisture. these have become a favorite of mine.
Perlite and peat moss:
A mixture of perlite and peat moss may be considered a little “old school” when it comes to a cloning medium, but it is tried and true. Perlite is a type of volcanic glass that when heated it expands in size creating what resembles a small puff ball with a bunch of pockets in the “stone” to hold air and water. Peat moss (or Sphagnum) on the other hand, is a bog moss that has the ability to hold lots of water.
These two materials are typically mixed in a 50/50 combination allowing them to hold large amounts of water and oxygen. The cuttings are then tucked into the mixture standing upright. The roots will grow and the plants can be gently removed from the perlite/peat mix and then placed into their new pots. This technique can cause roots to get entangled if left too long. Also cuttings can fall over during watering as well which makes it a bit more difficult of technique for a first timer. Care should be taken if you plan to use this method.
Aeroponics:
Aeroponics is a type of hydroponic growing. This means that there is no medium to put the cuttings into. Instead, it uses a reservoir of water and a pump to spray the cuttings stems to stimulate root growth. One of the more popular commercially available systems is called an EZ-Clone. The machine has neoprene disks built into the lid allowing for easy access of your starts. The cuttings are placed into these neoprene disks leaving about ½ to 1 inch of stem sticking out the bottom. The chamber the stems protrude into allow for humidity to rise which makes a great environment for roots to take hold.
Taking the Cutting:
Once you have determined what medium you will be using to root your clones, the cutting part itself is universal. I personally prefer taking my cuttings when the cutting can be larger. My philosophy is the bigger the cutting, the more of a head start I have on the vegging process. However, this isn’t without it’s own issues. Bigger cuttings can take longer to root, and can be a little more difficult. I suggest you try different size cuttings until you find a size that is good for you.
Now lets get to part we have all been waiting for. The part where you actually take the cutting. Select a branch and count down at least 3 nodes from the top cluster. A node is the intersection where the leaves protrude from the stem. Then with a sharp pair of scissors or a razor blade, cut the clone at approximately a 45 degree angle about ¼†below the third node. Cutting the stem at a 45 degree angle at this stage helps to stimulate root growth. Once you have the cutting removed, gently peel the bottom node and leaf off stripping the stem of it’s skin. Removing the skin in this area allows more surface area for the roots to form and will be the area where roots will begin to emerge.
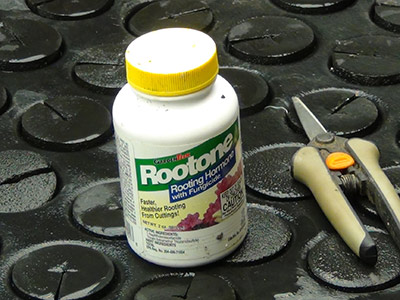 Now that you have your cutting, dip the cut end in a rooting gel like Roottech, Olivia’s, or a powder like Dip N Grow. All these products contain a hormone that essentially tell the stem to begin growing roots.
While I am taking my clones, I like to cut the tips from the remaining large leaves. Removing the tips will stop those leaves from photosynthesising and divert it’s stored energy to growing roots.
Now the cuttings are ready to be placed into their chosen mediums. If you choose to use cubes, plugs, or perlite, you will want to use a heating mat under the trays, and a humidity dome over the trays to promote growth. If you choose to use the aeroponics system, they create humidity and heat in the reservoir so an additional dome is not necessary.
The cuttings will need to be checked frequently to ensure there is adequate moisture. Remove the dome occasionally to allow the plants to vent and take in some fresh air. That’s pretty much it in a nutshell. The cuttings will generally take 5-14 days to root depending on your temperatures and humidity.
Lighting
Although I won’t spend much time talking about lighting in this article, I am sure some of you are wondering about lighting for your new clones. We can do a whole article on lighting, and we have written an article about lighting principals you should definitely read it as it contains lots of great information.
In general, a couple of 4 foot fluorescent lights left on for 24 hours is sufficient to root and maintain your clones. Fluorescents don’t produce much in the way of heat, so If your room gets cold be sure to use a heating mat.
All in all, taking clones is a pretty easy thing to do and it saves you a lot of time and money in the long haul. Happy cutting!
Taking your first clones,


Thank you for this article! I hear so much re. cloning and this is the best ‘basics’ article I have found so far. I planted my first three sprouts today and I can’t wait to get to the cloning stage.
when using the perlite and peatmoss method: how moist do you have to keep it to get the roots to sprout? do you water it every day or just once? I’ve never tried this method but would like to try.
Keep it moist but not soggy. Best use a tray with holes in the bottom. Can sprinkle the medium with water daily if needed.
First timer here… After clones have rooted, what are the next steps I take? I have chosen to use the rapid rooter cubes.. Do I leave clones in the tray or do I transplant them into the cubes and plant the cubes into soil? Also, after clones root is that when I switch to the 18:6 light schedule and then after about 3-5 weeks switch to the 12:12 for the flowering process?
After the clones have shown roots, you transplant them into whatever medium you will be growing in. If you are growing in soil, you pot them up in some soil.
At this point you can put them on an 18/6 schedule if you want. I would recommend keeping them on a 24/0 for a weeks for their lil roots to start getting established.
As far as when to start 12/12 that depends on what style you are growing and how big you want the plants to be.
Youtube has a great video on decarboxilating using your oven, mason jars and lids and a thermometer with prong digital you use to check temo of meat ect. while cooking. Easy product in oven without lids, prong in one jar. When time is done out comesthe jars, lids put on. Back inti oven for a bit. Out they come, cool jars and they are ready to cabinet store for now, later or 6 monthes from now.YouTube. But your artical is spot on. Video is visual aide for all. Good explaining. Did all mine just like you wrote except I used jars cuz I had a lot to store and it saved me a step. Aloha…
Is a product like root tone safe to use? the label says not to use on cuttings meant for human consumption.
Commercially available rooting stimulators contain Naphthaleneacetic acid, Indole-3-butyric acid or both. These chemicals are commonly called plant hormones, but can probably be more accurately called plant growth regulators. Their uses is widespread throughout the horticulture industry, most growers use them for cloning. however if you find yourself overly concerned there are alternatives. Earth Juice makes an OMRI certified rooting gel, I’m not sure whats in it, or you can simply forgo the stimulators and simply root without it.
The real hippie dippy method is to use young shoots from willow trees to make a rooting solution, I have to admit that I have tried this and that the cuttings did root.
Thanks. I’d rather be safe. I’ll check out Earth Juice.
(N.p.k )is nitrogen potassium and potash plus a few additives your local grow supply shop can and will help you out at all the stores i have been to most employees know how to grow very well and will help u out alot i cant stress enough about reading but when it comes down to it everyone is a professional happy growing may your plants grow 20 feet tall with huge budes a 4 pounder dryed with high thc content i have done it u can too.
what lights is best to use, is 300watt led lights worth buying??
I’ve been curious about LED grow lights for some time but I haven’t tried one yet. Part of me feels like I’m behind the times but for cloning a single T5 florescent bulb works just fine.
hello,i’m first time cloning,after the cutting and putting the hormone root’s where i put the clone?in the soil immidetly or in a glass of water?
Cut, water, hormone, then oil. You can leave out the water if you cut and go straight into the hormone then straight into the growing medium. I’ve had the best luck with rapid rooter plugs.
That was really a awesome amount of information