
Feeding a few dozen marijuana plants can be a chore. This task can be made simple by installing a fertilizer injection system, that automatically mixes your nutrients for you.
When it comes to injection type fertigation systems, the EZ-Flo systems may well be the most economical and easiest to use on the market today. While the Dosatron, and similar water powered fertilizer injectors may be a bit more precise, at an entry level price of about $250.00, they are out of reach for many growers. If this is your first time growing, shelling out for a more expensive mixer may not be an option when an economical solution is available.
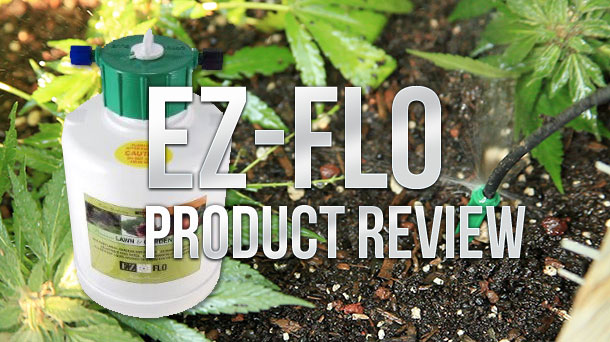
 The EZ-FLOW comes in 3 styles; the Hose End System, the Main Line System, and the Constant Pressure System. For most people, the Hose End System will be most appropriate. It is also the only one which I have personal experience, so it will be the focus of this review. For those requiring a large permanent installation, exploring the Main Line System may be worthwhile.
The Constant Pressure System has a reinforced tank, so that it can be left pressurized without damage to the tank, like the Mail Line Systems, which have much larger constant pressure tanks and cost much more. It  comes in the 1 gallon size, only. This means you can install it ahead of any and all valves and timers. Other than the fact that it can be left pressurized continuously, it’s identical to the Hose End System. For most growers, a constant pressure system isn’t necessary, and may even be an inconvenience to use. Actual operation of all systems is similar.
The Hose End System comes in 3 sizes; 3/4 gallon, 1 gallon and 3 gallon. If you are only growing a few plants, then the 3/4 gallon system, which can be purchased for around $50.00, or the 1 gallon system, priced at around $85.00, may suit your needs. If you are trying to feed more than 10 plants, I recommend the 3 gallon system. Trying to get the amount of fertilizer needed for a large number of plants to dissolve in only 1 gallon of water can be extremely difficult, if not impossible. It should also be noted that while it’s called a ‘hose end system’, it’s really a bit more permanent than that name would imply. It’s not something you hang on the end of a hose and then spray the ground and the plants with.
Installation
The first thing one needs to acquire and install, however, is an anti-backflow valve (anti-syphon valve) which must be placed directly on the faucet powering the system. This will prevent any chemicals, or fertilizers, from being drawn back into your water system, where they may then be able to make their way to your interior house faucets. Unless you like drinking poison, THIS IS A MUST!
Next, a piece called the ‘irrigation coupler’ is attached to the anti-syphon valve, unless you plan to use a timer, in which case it should be placed between the anti syphon valve and the irrigation coupler. This ‘irrigation coupler’ has 2 small ‘push on’ fittings which attache to the fill and feed lines. Each of these lines has a threaded plastic fitting, one blue and one green. These screw onto a threaded fitting on the tank’s lid, one is marked, “Water In Blue”, and the other marked, “Fertilizer Out Green”. The other side of the irrigation coupler goes to a 100 micron filter, and its output feeds the drip system. This filter is extremely important as emitters have been known to get plugged up by small particles from the fertigation tank. This will not only water from reaching a plant, but nutrients, as well. Often times the moisture pattern of the emitter is hidden beneath foliage so a great deal of yield can be lost by such an occurrence before it is noticed. If there are other plants in close proximity, the first indication of a problem may well not be wilting, but yellowing of the lower fan leaves from lack of Nitrogen. It usually will take as much as 3 weeks for such a Nitrogen shortage to show, meaning that by the time it does, as much as â…“ of the plant’s ultimate size can be lost. It will only take one such experience to teach you to check the emitters daily.
Operation
These injectors systems can be used two ways. Dry water soluble fertilizers can simply be placed in the bottom of the tank and be mixed and dissolved by the unit as it operates. The lid has 2 tubes extending down from its bottom. Each of these tubes has been plugged onto a small barbed fitting that is threaded and screws into bottom of the lid for easy removal and installation of the tubes. The pickup tube has a small filter attached to its end, and the fill tube has a small restricted orifice in its end. This reduction orifice is intended to cause the water to enter with some force and help mix and dissolve dry fertilizers.
If you are using liquid fertilizers, or if you plan to dissolve dry fertilizer before hand, which is recommended to be certain it is fully dissolved, then this fill/mix tube should be unscrewed from the lid and left out during operation. This allows the fresh water to enter directly from the bottom of the cap, at the tank’s top, instead of at the bottom. This assures that the pickup tube is drawing full strength nutrients and not the liquid that has been watered down from the fill tube exiting at the tank’s bottom. If you are adding things like seaweed, humic acid or molasses, all of which tend to settle more heavily at the bottom, then after giving the system enough time to remove all but about an inch from the bottom of the tank, reinstall the fill tube so that it will stir up that bottom layer. This will help insure getting the last of it to the plants.
The unit works because the fertilizer mixture is heavier than the fresh water. The water entering the top of the unit builds pressure in the unit, causing the nutrients to flow up and out through the ‘feed tube’, whose filter end is at the bottom of the tank, and the fresh water simply floats atop the nutrient mixture. If the mixture has any color to it, which all three of the above mentioned amendments do, one can see this phenomenon through the semi transparent tank, a clean line showing the dividing point between the water on top and the nutrients on the bottom.
One caveat–the manufacturer, building this for use both with dry nutrients and dissolved nutrients, left the filter end of the pickup/feed tube inside of the tank about an inch above the tank’s bottom. This causes that last inch of nutrient mix to remain at the bottom, unused. Â It would seem that not even reinstalling the feed/mix tube at that point adequately solves this problem. Similar tubing can be found at most hardware stores, and I recommends installing a new piece of pickup/feed tubing inside the tank so that when the lid is screwed down, the filter actually touches the bottom and causes some bending of the tube. This, along with the reinstallation of the fill/mix tube when the color line is at 1 inch, will facilitate complete evacuation of all the nutrients and eliminate any waste. If your nutrients have no color to them and you wish to watch this process, the addition of some food coloring to the mix before starting is harmless and will allow to observe. Obviously, darker colors are best.
Flow Rate and Pressure
This system pressurizes the tank, so a pressure regulator is necessary and will also eliminate pressure fluctuations and insure a constant delivery rate. You will probably need one anyway to regulate your drip emitters. Most emitters will have a gallon per hour (gph) figure associated with them, but this is always at a given pressure. With this system, the best results will likely come at 15 to 20 PSI, and most water systems produce significantly more tha this. Don’t worry, pressure regulators are inexpensive. If you are able to keep the pressure a that which the emitters are rated for, then you’ll know how much water you’re applying with the nutrients. Simply multiply the hours you have run the system by the rate the emitters flow. In most situations, the exact amount of water isn’t all that important, as long as the plants are getting enough, and you’re not over watering. This is something you’ll have to determine for your type of soil. I have a sandy soil with great drainage and can run the drip for 4 hours daily, without over watering.
The unit’s cap has a small lever on it that is labeled, “Slow”/”Fast”. In the instructions, it tells you that for fast vigorous growth, you should use the “Fast” setting, etc. This would seem to be for people using the system by placing dry fertilizers in the bottom and letting the unit mix them, and maybe for the ‘set and forget’ crowd who leave fertilizer in it, but not for you. It is not recommended that the system be used this way, and a better use for the flow rate lever is to determine the ph and EC/TDS/PPM that is actually going out to the plants. Simply install a ‘Y’ valve at the output of the filter. Attach the drip system to one side, leaving it always in the ‘on’ position and attach a 1 or 2 foot piece of garden hose to the other side, which you’ll leave in the ‘off’ position. When you wish to draw samples, allow the unit to run along enough for the nutrients to begin flowing full strength. You will be able to tell by the absence of bubbles, or a color change in the semi-transparent output tubing. It only takes a minute or two. Take your sample and then increase or decrease the flow to suit your ph and nutrient level needs.
For example, a feeding for 30 plants might be something like 1.25 lbs of a fertilizer like a 21-7-14. If this amount is mixed with 2 gallons of water, the EC/TDS/PPM will be off the scale of the meters available to gardeners, and the ph will likely be down somewhere near 4. For some gardeners, this ph isn’t a concern, as they have taken into account the acidifying nature of the fertilizers and added adequate Dolomite prior to planting. If you want to buffer the nutrients before they go in then you’ll need to do an experiment.
Let’s say that the water you have has a ph of 7.3. Then with the flow lever in the ‘slow’ position, you want the final ph of your fertilizer mixture to be around 6.1 or 6.2. With this ph, when the fertilizer is injected into the irritation water, the resulting ph at the output to the drip system will be 6.6 to 6.8. Of course, this will rise as the nutrients run out and only the water is flowing through the system. Having those nutrients go into the ground at ph 6.8 means that they are at a ph where the plant can use them immediately. For this reason, feeding smaller doses daily, or with every irrigation, is recommended. This has the added benefit that plants seem to love being fed frequent low doses more than infrequent high doses, and low doses rarely burn. If you are feeding heavily, even using smaller doses daily, you should flush the salts out a couple of times during the grow. This is especially true if you don’t have very fast draining soil.
Large plants over 5′ tall can take as much as one tablespoon per day of 21-7-14 in sandy soil. Heavier soils may require a lighter feeding. This is something you can only learn with experience. It might be advisable to set up your garden with 2 drip systems, and feed half the garden one day and the other half the next day. This will allow you to feed the 2 sections at different rates, in order to learn just how hard you can push the plants, and it’s likely that you will learn that the plants can take far more fertilizer, especially Nitrogen, than you ever imagined. This is why it is also recommended that you source out an N only product, like Simplot’s 21-0-0 Ammonium Sulphate. Feeding a complete fertilizer on one day and coming back on the next feeding day with straight Nitrogen can generate some very rewarding and impressive growth, but approach it slowly, so as not to overfeed. Some growers have been known to apply as much as 25 Lbs. a week of 20-10-10 on 25 plants.
The bottom line on this product, I highly recommended it. Unless you have the money for the Dosatron I think it’s the way to go. One has to wonder why the extra expense is necessary when first class results have been observed using only the EZ-Flo. The Dosatron does have a few advantages, so if you have the bucks, go for it. Otherwise, the EZ-Flo is the way to go. If you are interested in making a purchase, the EZ-Flo is available online through Drip Works and many other retailers.
EZ-Flo Fertilizer Injector,


we are a group of marijuana growers of both indoor and outdoor .and have license for the sales of medical marijuana.our cannabis has perfect THC for both average and ancient consumers . Presently there is the availability of all kinds of strains and buds .White widow,northern light ,afghan kush,hindu kush ,bubba kush,afghan incense ,master kush,strawberry kush,blueberry kush and many others etc .More so all our stuffs have their various flavours and THC and nothing has been added to it or deducted . We do express delivery to distant buyers and offer door to door delivery at clients destination for local buyers .
Any one interested contact me 1(234) 205-1103 or email.. jamesrhrhodes2001(a) gmail.com..